Showing posts with label handmade holidays. Show all posts

day twelve handmade holidays: Thank You Notes

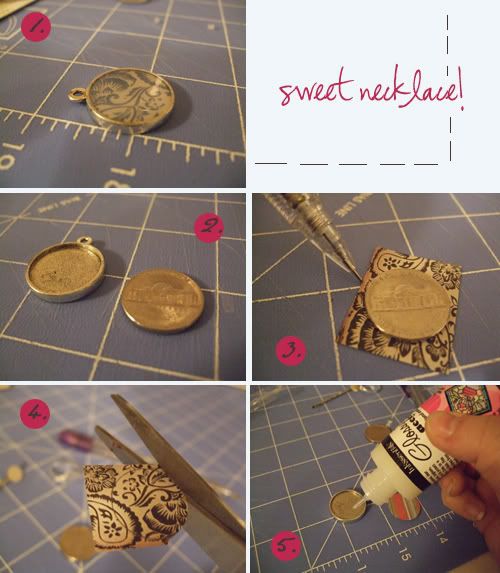
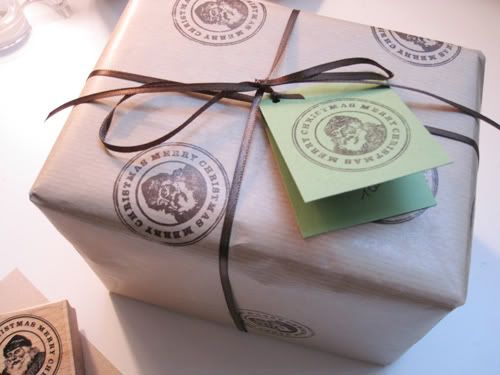
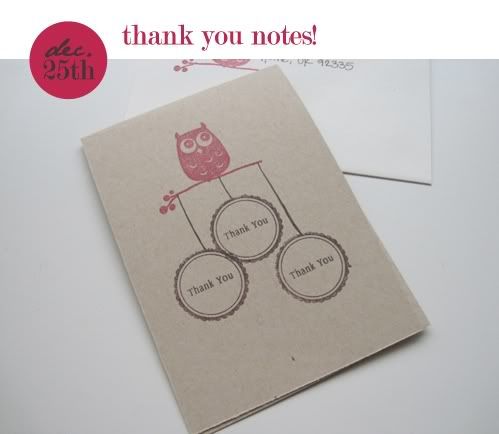
It's finally here, Christmas morning! I may be in my (late) twenties but I still can't sleep all through the night before. For those of you tearing (or gracefully opening) your lovely packages from friends, family, or loved ones this early morning here is a great post holiday project: thank you notes! These would also make for darling winter solstice or new years cards, with a different stamp of course.

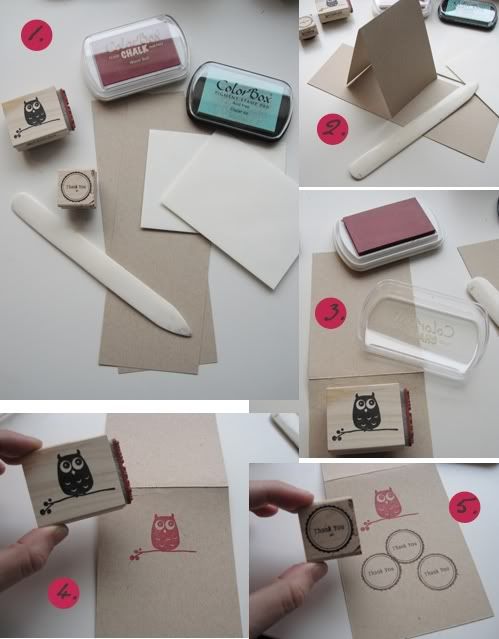
step 1: Your ingredients: 8.5 x 11 card stock, bone folder (or dull butter knife), stamps, stamp pads, A1 sized envelopes (these fit a 3.5 x 5 card), paper cutter, and a pen.
step 2: Cut your card stock into two 3.5 x 10 pieces. Using your bone folder fold your card in half to create a 3.5 x 5 folded card.
step 3: Starting with my owl stamp and red ink, flatten your card to make stamping easier...
step 4: I stamped the larger stamp towards the top so the thank you stamp had plenty of space
step 5: Using my small thank you circle stamp I stamped 3 times re-inking in between each stamp

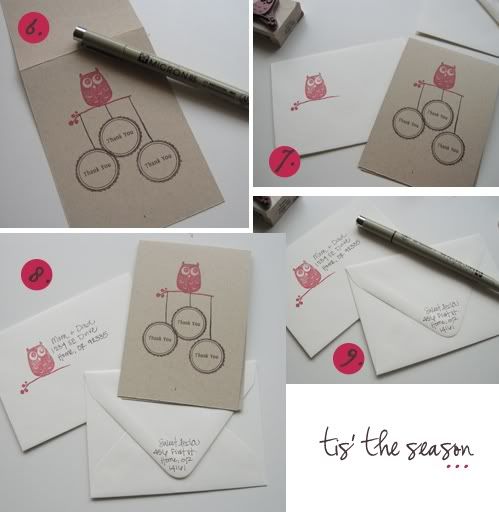
step 6: Using a fine tip brown marker I drew three lines down to make the thank you's appear as little pendants
step 7: Incorporate your stamp on your envelope. It will go through the mail just fine!
step 7: I stamped the owl in the middle of the envelope so my address could be nestled inside.
step 9: Write your return address on the back flap to give your front address more space.

THANK YOU for spending these handmade holidays with me, this has been my most favorite blog project to date! I will be spending some much needed time with family and my sweetie, but I will be back very soon with a New Year's Eve collection crush, a few updated goals, Six Sweets for January, and some other fun things for the new year. Happy Holidays sweet bees!

day eleven handmade holidays: Placecards


My family have always eaten dinner on Christmas eve and not much has changed! Well it usually begins in the early afternoon with a full day of grazing on appetizers and games then sometime late into the evening we get to that delicious dinner. This year our table will be the fullest with family it has ever been so I thought these would be a darling addition!


step 1: You will need the following materials: cardstock (in colors you like!), printed paper, double sided tape, paper cutter, pen.
Cut your solid cardstock to 4" x 3", and fold in half so each placecard measures 2" x 3".
step 2: Cut a contrasting color cardstock to 1 1/2" x 2 1/2", using a little piece of double sided tape attach it to your placecard just a tad to the right.
step 3: Cut your printed paper to 1 1/2" x 1 1/2" squares, and using your double sided tape attach this to the left side of your colored paper.
step 4: Write your friends + families names and set your lovely table!

step 5: For a different look, use your placecard to write on and use some printed paper for decoration. Cut some printed paper to 2" x 1 1/4" and adhere to one side of your placecard.
step 6: Write your guest's name (or a fun quote) and set your table!

Tomorrow's my last handmade holidays post: thank you notes. Happy Christmas Eve!

day ten handmade holidays: Gift Tags!


In addition to scheming up my gift wrap design at least a month before Christmas (like a real paper adoring dork) I can't forget about the gift tags! This old post are my tags from last year, kraft paper always seems to make it's round this time of year. Here are three tag ideas with my favorite print maker: rubber stamps.

step 1: you will need blank tags (of any color to your liking), festive holiday stamps, stamp ink (note: I use both pigmented and dye inks here because my paper can absorb both with ease), printed paper, paper cutter, double sided tape, pen. My printed papers can be found here.
step 2: for one tag I cut down some of the printed snowflake paper and added a sold piece to create a border. Using my do not open until Christmas stamp and some red ink I repeated the stamp for a full print.
step 3: for another tag I used a simple circle stamp and the plain white background for another printed tag. Both of my stamps I snatched up for just $1! (see the finished tags above)

step 4: for my last tag I started by stamping my white tag in the same repetitive pattern as the first one.
step 5: using that as your backdrop cut some printed paper and solid paper for the front using double sided tape to attach.
step 6: find a colorful pen to add your recipients name, like this sea foam sharpie :)
Now your gifts are ready for your handmade gift tags and just in time to slip them under the tree. (if that's where they are headed) Just two projects left, check in tomorrow for: holiday dinner place cards!

day nine handmade holidays: paint your nails!

A sweet friend of mine has become my personal nail polish guru! (and a ton of other people too) Not to mention she gifted me that bottle of Chanel polish for my birthday that I am coveting :) I will let her share her nail geniusness with you:

Tis the season to be festive! Nothing makes me feel more festive than a fun color on my fingertips, so I’m sharing my favorite holiday nail colors with you. I tried to choose both high and low-end polishes, so there is something for every budget.

no. 1 Reds and Golds: There is no better time of year to play with sparkle than the holidays! It’s actually the only time I really go nuts for glittery polish. I know I just said to think beyond red polish, but it really does work on everyone and is perfect for Christmas time. Recently I’ve started hunting for coppery golds, and this stunner on my thumb is my favorite. The richness of the copper looks good on all skin tones, even my pale pinkness. I love a good dark red nail polish, I’m constantly on the hunt for the darkest I can find. Look for something with a bit of shimmer in it so it reads as red, not black. If blood red isn’t your thing, the holidays are a perfect excuse to bust out your brightest, glitteriest red—this ruby slipper-inspired color by China Glaze never disappoints. Chocolate brown is starting to pop up more in polish and I can’t get enough. It’s especially appropriate at the holidays when sweets are everywhere and cocoa is necessary to get warmed up from the inside. Gold is so fun to wear any time of year, but it always brightens my spirits when it’s crummy outside. I bought this gold on impulse while I was waiting in line at Forever 21 and it’s one of my favorites.

Thumb to pinkie: OPI Rising Star, Sinful Colors Burgandy Apple, China Glaze Ruby Pumps, OPI Suzy Says Da, Forever 21 Gold

I’ve been buying polish like crazy for the past two years and the one piece of advice I have is to never judge a polish by its brand. It’s pretty much all made from the same stuff! Thanks for reading! -m

I am surely buying a bottle of Sinful Colors Burgundy Apple in time for Christmas eve -- just three handmade holiday posts left! Stop by tomorrow for: gift tags!

day eight handmade holidays: Stationary Set

Just five days until Christmas, but don't fret, for just $5 wrap up a darling stationary set!


step 1: for this fun project you will need: stamps (#1-I grabbed a bird and bee set, but monograms are a classic style too!), ink pad (#2-dye ink will dry quickly), 2 sheets of cardstock, 3 sheets of text weight paper (text weight paper is just light weight paper), 10 A1 envelopes (these fit a 3 1/2 x 5), a paper cutter, 5x7 box, ribbon or raffia.
step 2: Cut your card stock down to 5x7 and then fold in half. Cut your text weight paper to 5x7 and leave large. This way your recipient gets folded cards and stationary paper for letters!


step 3: My stamp set came with several different stamps, so I used 3 for my set. Stamp an image on the front of your folded cardstock, and maybe at the top middle of your text weight paper.
step 4: While those dry, grab your envelopes and stamp the bottom right with another image.
step 5: Now that all of your papers and envelopes are stamped you can stack them in your box. Place the text weight paper flat in the bottom, fold your cards and place them on top, and place your envelopes on the other end. (Turn an envelope over behind the front one so the flap comes over the front)
step 6: Out of the same paper as the folded cards, make a small little note card to write a message in. I stamped the front with the little bee!
step 7: Close up your box, grab your ribbon or raffia, wrap up your box and tie a bow in the front. Finish it off with a colored pencil or fun pen!


Even without wrapping this will look darling under a tree or sticking out of a stocking. Stop by tomorrow for: another surprise guest post!

day seven handmade holidays: feather hair adornment

I made a batch of these for the recent Crafty Wonderland and adore slipping them in my hair this time of year! The best part being that they are so simple to make and each is an original made just by you.

step 1: You will need to start with- single feathers (you can find these at any craft store in a bag for just a couple dollars), small piece of printed cotton, thin ribbon, alligator clip, scissors, and hot glue.
step 2: Start with a few larger feathers and begin layering them in hand to get the look you like. Place a small dollop of glue on the back of each feather as you layer them together.
step 3: For a little contrast mix and match bright colors with dotted black and white in the back.

step 4: Once your feathers are glued together finish off the ends with some ribbon. Cut an 8" strip of ribbon. Glue the middle of the ribbon to the top of your feather base. Then wrap in both directions finishing in the front in a knot.
step 5: Take your printed cotton and cut out a small circle, about 1 1/2" in diameter. Once cut out cut two tiny slits in the middle next to know another for your clip to slip into
step 6: Slip your alligator back through the slit in the cotton circle, glue the back down to the cotton
step 7: Place glue on the back of the whole cotton piece and attach to the back of your feather piece. Slip into your hair and enjoy!

These make for great gifts too, and who doesn't love a handmade gift? Stop by tomorrow for a darling gift under $5 (and with just 5 days until Christmas)!

day six handmade holidays: jewelry collection from nimbi designs!

Today's guest post comes from the ultra adorable Devan of Nimbi Designs! She is a very talented designer and graphic artist, but really I see her as a Jill of all trades. Here is just one example of that: a jewelry collection set to wrap up for someone special or wear to that next holiday party. I will let Devan take it from here ;)

For this project you will need these tools: diamond glaze (clear drying liquid adhesive), scissors, decorative paper, (no 1.) Making Memories “Paper Reverie” 18 pc set (comes in several color options, for this I used “Noir”, runs about $5 for a set), (no 2.) Necklace backing, Silver hoops for necklace making, Silver Blank ring, Silver blank double sided necklace piece, Silver Earring piece pair, Pliers, Disposable paint brush. (grab all of these at your closest craft shop!)

step 1 + 2. Take your bobby pin piece and add a little bit of Diamond Glaze on the flat silver part of the bobby pin with your disposable paint brush.

step 3: Then take your chosen piece, in mine I picked the black sparkly flower, and place the Diamond Glazed piece to the flat side of the plastic rose. Let it sit and dry. Should only take a hour or two to dry since it’s a lighter amount of Diamond Glaze.

tep 1. the pendant when it's all finished up!
step 2. For this necklace (about nickel size) I chose a paper that matched the “Noir” collection to cut out and place inside the Double-Sided necklace
step 3. To get the right size I took a nickel and placed it on a the paper, and drew with a pencil lightly tracing the shape and size of the nickel
step 4. Once you’ve traced the shape out, take your scissors and cut along the line.
step 5. Then I take the Diamond Glaze and put just a small pea sized drop inside the Silver piece -- I use my disposable paint brush to evenly spread the glaze around. Once it’s set poor a little bit of the Diamond Glaze inside filling and covering evenly over the paper design. This will take about 12-24 hours to dry fully so sit it aside until the Diamond glaze has hardened and turned clear.
step 1. I chose 2 of the black jewels and replaced the hoops on them with larger silver hoops to match my silver earring pieces. Use your pliers to remove and add these.
step 2: Once you’ve done that, add your earring piece, and close the hoops tightly, so that it doesn’t have a gap to fall out.
step 3: Your earring is done. Do the same for your other earring and they are ready to wear.

step 1. Take your silver ring piece, and just like you did for the Bobby Pin, use your disposable paintbrush to add diamond glaze to the flat part of your ring.

step 2: Add your chosen piece for your ring and let it sit again, for at least 1 to 2 hours.

Now you’ve made an entire little accessory set as a gift -- you can give them individually or as a fun set. The best part is you have several other pieces to use and make many more from. Perfect girlie gift for the holiday season and great for a New Years Eve wear. Have fun making your pieces and Happy Holidays! – Nimbi Design

Thanks for reading my super fun guest post! I have been looking forward to having her here :) I have one more guest post coming up in a few days filled with vibrant colors! And don't miss tomorrow's post: feather hair accessories.

day five handmade holidays: Knitted Coffee Sleeve

This is a project I have wanted to create forever. Well since I started knitting which was not forever ago, but still the project has been looming and just in time for the holidays! This sleeve was quite quick and may just end up in someone's stocking next week :)

step 1: gather your knitting ingredients: worsted weight yarn, needles size 8, cable needle, button. (if you are a beginning knitter you can handle this project, promise!)
step 2: I purchased this darling sleeve pattern from Etsy shop Natalya's Studio and highly recommend her patterns. As far as cabling goes, here is the basic how-to:

Cabling is simply slipping stitches onto a holding needle, knitting across, and then knitting the stitches you set aside back on. Moving them to the side (or onto your cable needle) and then knitting them back into your working needle creates a cross that over several rows will look like a braided twist, or cable.

If a pattern reads C6F, this means slip 6 stitches off and hold them on your cable needle in front of your project. Knit the following 6 stitches, then knit from your cable needle.
If a pattern reads C6B, this means slip 6 stitches off and hold them in back of your cable needle, etc.

It's that simple, honest! If you are looking for an easy to use cable book I highly suggest cables and arans from the harmony guides.

step 3: I finished my sleeve off a tad different then the pattern called for and created a larger strip that I attached to the other side with extra yarn. Sew on a large button and enjoy your next cup of (now fancy) coffee! -Or- box this up for a darling holiday gift sure to keep a loved one's hand warm this winter season :) Check in tomorrow for: a surprise guest post!

day four handmade holidays: paper ornaments

There are more then many ways to make paper ornaments, but these are 3D!

Once you get the hang of these you can whip them up in no time, and they are kid friendly!

step 1: You will need these materials- cardstock cut into a shape you like (I chose 2" circles to match the circle stamp), a decorative stamp, stamp ink, double sided tape, scissors and ribbon.
step 2: Stamp your cut paper. Like in the previous post I prefer dye ink for fast drying. You only need to stamp one side.
step 3: Let your pieces dry if they need to.
step 4: Fold your shapes in half. I used a bone folder to place a score line in the middle to make it easier to fold. If you don't have one you can also use the dull side of a butter knife.
step 5: Place a small strip of double sided tape on the back of your scored shapes.
step 6: Tape two pieces together, then before placing the third cut 12" of ribbon. Loop it and attach the ends to the tape inside the ornament. Finish off with the third piece of cardstock to hold your ribbon in place. Hang them up!
Our tree is filled with little handmade ornaments, it makes it just a bit more personal. Don't miss tomorrow's post: knitted coffee sleeves! (<--I have been can't waiting to share this one!)

day three handmade holidays: stamped gift wrap!

I love wrapping gifts almost more then gathering them up, it's another place to get creative! Here is a simple way to make your gift wrap more fun, hand stamping it. I found this stamp for just $1, it came in very handy.

step 1: Gather your materials. I love light weight kraft paper, but any blank paper will do great, even white. Also you will need scissors, tape, a stamp, and stamp pad.
step 2: Grab the gift you are wrapping and measure your paper, cut to size
step 3: Lay your paper on a hard surface and to keep it from rolling up just use some heavy items to hold the ends down. Start stamping! I prefer a dye based ink, they dry very quickly and won't stain your skin (as opposed to pigment based inks) Stamp randomly, it will turn out cute!
step 4: Wrap your gift with some double sided tape to hide in the folds.

Finish off with some matching ribbon and a little tag. And when your present gets opened you get to gloat about making it yourself :) Stop by tomorrow for: paper ornaments!

day two handmade holidays: favorite cookies recipe box!

These are my favorite holidays cookies that my mom has been making for I don't know how long. A few seasons ago I started making them as the perfect holiday party treat. They are pretty simple and don't involve an oven!

You will need these ingredients-
no. 1: rice crispies. I found some gluten-free ones with less sugar in the organic section
no. 2: crunchy peanut butter. You will use almost the whole jar!
no. 3: powder sugar
no. 4: semi sweet chocolate, my baking staple :)
no. 5: mini cupcake wraps are great if these are going to a party for individual servings
no. 6: butter

1. Start by melting your chocolate, it will stay smooth while you make the cookies. I always make a double boiler out of a small pan (fill it with about an inch of water), and a cereal bowl over the top.
2. The chocolate will start to melt within about 5 minutes. Start moving the pieces around with a butter knife to help melt them evenly.
3. Move on to your peanut butter mixture. Everything just gets piled together!
First, cream your peanut butter, powder sugar, and butter. Once combined add your crispies a cup at a time. Work together with your hands but careful not to smash the cereal! It will look like no. 3, not too pretty but yummy :)

4. Using your hands roll together small balls. 2 Tablespoons is a good estimate. Then dip your ball into the melted chocolate and sit on some wax paper for cooling. You could get about 2 dozen out of your mixture. Pop the tray in the fridge for 30 minutes to set your chocolate.
5. Here's how they look when all done! You can store them in an air tight container on your counter.
6. Nestle them in little fluted wraps for easy handling around a treat table. Enjoy!

Stop by tomorrow for: stamped gift wrap!

day one handmade holidays: 12 Days Before Christmas Gift Tree

(To start off the handmade holiday's is my darling mom. She had all kinds of wonderful tricks up her sleeve when I was little (come to think of it, she still does) here is one I truly loved!)

Our children are all grown and have flown the nest, but when it comes to Christmas they're all five years old, again. It reminds me of one little idea I use to do for them to calm the waiting & excitement of Christmas is coming. We lived away from our families when the kids were little, so The Christmas Truck (known as the UPS truck the other 11 months of the year) would deliver packages from all over the U.S., the kids would go crazy--"Can we open them now?" "Please-Please-Please?" "It has my name on it, I should open it RIGHT NOW!" The UPS person became Santa in the eye of my children.

I had done Advent Calendars with pieces of candy inside - but, with the kids just coming down from the Halloween candy high they didn't need another sugar rush to add to their already hyper holiday. So, I decided to do something a little different. I started the 12 Days Before Christmas with a Partridge in a Gift Tree.

I used a small, 2 foot artificial tree and attached 12 little wrapped gifts with their names and a number for each gift per child. The gifts were little things - gum, a small toy, a dollar bill, Christmas candy, a personalized notebook, an ornament, small bag of popcorn, hair ribbons, a matchbox car, a small necklace, etc., the 12th gift on Christmas eve was usually a note to find mom and I would give them a new Christmas book. The tree was waiting for them the morning of December 13th and they could find the gift of the day waiting for just them. It worked too! It took the edge off of begging to open a gift and made the waiting for Christmas to come a little less stressful for them (and me).

Leda here: today the tree is all wrapped up for a very special little boy and I know all us grown up kids are waiting in anticipation for his reaction to this very sweet tradition. You can read more of my mom's musings, and see her scrapbook genius unfold on her blog here! Check in tomorrow for: my favorite Christmas/holiday cookies recipe box!